Menu
Join Our Email List
- Receive our monthly newsletter.
- Stay up to date on Amazon policies.
- Get tips to grow your business.
/%5BeComEngine%5DLogo-2019-linear.svg "eComEngine Logo")
| Review Monitoring Quickly identify review trends |
| Review Monitoring Quickly identify review trends |

FBA stands for Fulfillment by Amazon. This program allows third-party sellers to send items to Amazon fulfillment centers to be picked, packed, and shipped to buyers by Amazon.
The FBA program launched in September 2006, allowing merchants to sell products on the world’s largest online marketplace while leveraging Amazon’s fulfillment centers and employees. Amazon FBA enables merchants to scale more quickly thanks to reliable service and predictable costs.
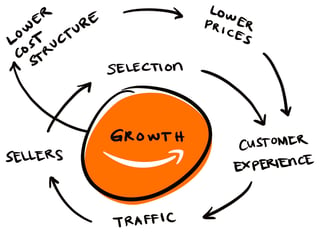 Amazon’s philosophy is deceptively simple: delight buyers with competitive prices and fast order fulfillment. Satisfied buyers continue to shop on Amazon, leading to more sales, which makes the marketplace more attractive to third-party sellers, who in turn pay commissions to Amazon. That's the Amazon flywheel in a nutshell. It has created a sustainable selling model that has allowed many individuals to gain financial freedom while exploring their entrepreneurial side.
Products enrolled in Amazon FBA are eligible for Amazon Prime shipping. Amazon continues to innovate and refine processes for streamlined and quick order delivery. To get an idea of how orders can be fulfilled in 48 hours or less (and, in some cases, within an hour), check out this list of Amazon fulfillment centers in the US. With multiple warehouses, Amazon can quickly get orders of popular items to just about anywhere in the US.
Sellers see a 20-25% increase in sales on average after enrolling in FBA.
Of the millions of third-party sellers on the Amazon marketplace, many are established brands that enjoy the volume of sales they get from Amazon. Others are resellers who work with manufacturers or distributors to sell products on the marketplace. Some of these resellers work with manufacturers to private label certain products, which gives those sellers a competitive advantage on Amazon because they are the only seller of that particular ASIN (Amazon Standard Identification Number). Another type of seller is the retail or online arbitrage seller, who sets up an Amazon FBA store and sends all sorts of different products into fulfillment centers, based on the availability and profitability of the item.
While third-party sellers (3P) set up an FBA store on Amazon, first-party (1P) sellers, also called vendors, send their inventory in to be sold by Amazon. Pricing on 1P products is controlled by Amazon, and “ships from and sold by Amazon” appears on product listings.
1P sellers cannot make changes to their product listings, nor do they have the ability to request reviews from consumers who buy their products. Amazon sends these vendors purchase orders, the vendor sends in goods, and that’s it. On the other hand, a 3P seller can fulfill orders through FBA, Fulfilled By Merchant (FBM), or a combination of the two. Third-party sellers control their pricing and, in cases where the seller is Brand Registered, their listing.

Amazon FBA is a game changer for third-party sellers, who benefit from outsourcing order fulfillment and customer service to Amazon. Utilizing FBA can help sellers maintain and improve their seller health metrics, since Amazon ensures a consistent customer experience.Jay Lagarde

Amazon FBA can be very lucrative for merchants. An estimated 76% of sellers turn a profit, with many of them finding success in the first year. Selling via Amazon FBA simplifies much of the work involved with fulfilling orders.
One of the reasons FBA is so successful is because the experience is so streamlined from the shopper's perspective. Many consumers don’t know that the items they are buying are sold by third-party sellers. But how easy is it to sell with FBA? In a word: very.
Note: You will experience fewer issues with Amazon FBA if you follow Amazon’s guidelines exactly.
Once your products arrive, they can be ordered and fulfilled. Easy, right? Amazon handles the bulk of customer service, returns, and questions. You’ll get paid every two weeks, with the automatic deduction of Amazon FBA fees.
If you happen to be a merchant fulfilling orders through an existing seller account, you can convert existing inventory to FBA. This is accomplished by going to the Manage Orders page in Seller Central and selecting Change to Fulfilled by Amazon from the Actions drop-down menu.
Most sellers will tell you that the pros far outweigh the cons when it comes to Amazon FBA. However, there are some things you should know.
As mentioned previously, it’s important to understand the fees associated with selling on Amazon FBA. There are fees all sellers must pay, fees associated with Amazon FBA, Amazon’s optional service fees, and other fees.
Amazon’s commission, or “referral fee,” is paid on each item sold. These costs are taken out post-sale and are assessed by category. For a full list of Amazon’s referral fee percentages and the applicable minimum referral fee, look at Amazon’s list of referral fees on Seller Central.
All sellers must also pay refund fees. When a buyer requests a refund and you’ve already been paid, Amazon charges a fee to process the refund. The fee is either 20% of the refunded charge or $5.00, whichever is less.

FBA shipping fees are assessed depending on the size and weight of the product that is picked, packed, and shipped by Amazon. For a list of fees by size and weight, look at Amazon’s current FBA fees, as they are subject to change.
FBA sellers must also pay monthly inventory storage fees for the space their inventory uses in fulfillment centers. The base monthly fee is determined by product size and time of year. A holiday peak fulfillment fee applies from mid-October to mid-January to offset additional fulfillment and transportation costs.
Beyond the monthly storage fees, an additional storage utilization surcharge applies to sellers who meet certain criteria. An aged inventory surcharge (previously the long-term storage fee) is added for units stored in Amazon's fulfillment network for 181 days or more. The surcharge is assessed in addition to the monthly inventory storage fee.
Amazon introduced more granular product size tiers in 2024 and added several fees, including the low-inventory level fee and FBA returns processing fee. Learn more about current FBA fees in this guide.
Sellers with more than 1.5 million ASINs may be assessed a monthly flat fee of $.001 per ASIN. This is called a high-volume listing fee, and it is paid at the same time as FBA storage fees. There are also closing fees associated with certain media products like CDs, DVDs, and books.

Utilizing FBA is critical for Amazon success. Approximately 80% of Amazon Prime customers filter by free 2-Day Shipping, and they spend 2-3 times more than non-Prime members. So, with merchant-fulfilled most Amazon customers never even see your product. With FBA your products will rank higher, get a higher click-thru-rate, and a higher conversion rate resulting in a 3x-5x increase in sales."Shannon Roddy
Related reading: Amazon FBA vs. FBM Checklist
When deciding how to find products to sell on Amazon FBA, you’ll need to consider what type of business model you can support. You can resell products on Amazon FBA, although it’s important to follow all of Amazon’s guidelines and provide the required documentation for your inventory.
Many sellers begin with reselling, or retail arbitrage, and then move to another model, such as sourcing white-label products, creating private-label items, or buying wholesale products to sell on Amazon. If you own an established brand with your own products, you can choose to sell via FBA or apply for a 1P Vendor account. The decision process as to what to sell on Amazon FBA depends on the type of seller one chooses to be.

There is no crystal ball to help you predict the best products to sell on Amazon FBA, so product research is essential. Getting a sense of what’s selling and why can help you scale your business much faster. Pay attention to trends in your niche. Read product reviews, both for your ASINs and competing ASINs. Customers are sharing exactly what they love and hate about products. It’s your job to use that information to inform your business decisions. Check out Amazon's Product Opportunity Explorer for useful insights.
A high Amazon sales rank means that the item sells quickly, but there is a lot of competition. An item with a low or non-existent sales rank can be slow to sell, resulting in aged inventory or removal fees. It’s easier to be the dominant seller of a product with a lower rank. In either case, you’ll have to be prepared to market your product on and off Amazon.

It is possible to purchase branded items from manufacturers or suppliers to resell on Amazon. This is called the wholesale model, and it involves reaching out to these companies to seek a relationship that allows you to sell products on Amazon. In this scenario, sourcing products is different from the arbitrage model. Many wholesale sellers do their best sourcing at trade shows like ASD or more niche trade shows. It all depends on the type of product you want to sell, and how many categories you want to sell in.
Sellers will negotiate rates and shipping costs with suppliers and manufacturers to keep their margins in a lucrative and sustainable place. Many wholesalers sell common ASINs on Amazon, so they don’t have to create listings. Private label sellers work with these factories to create their own branded products, which will necessitate a new listing and product photos. Private label sellers are a bit different from established brands in that they may not be selling their branded products on other marketplaces, and they may not produce an entire branded product line.

Established brands have found a tremendous amount of success on the Amazon marketplace. Opening up their sales channel to eCommerce has been a profitable endeavor. Brands have certain advantages on Amazon - including the ability to easily get Brand Registered (though other types of sellers may obtain Brand Registry), branded storefronts, and more.
Sellers who are Brand Registered on Amazon have far more control over their product listings. They also have access to special features such as A+ content and product videos to help bring more eyes and clicks to their products. These sellers often control the Buy Box, have a definite advantage in organic search, and have more on-Amazon advertising options. Brands that sell 3P on Amazon enjoy more pricing freedom and less dependence on a relationship with Amazon than 1P vendors.

As a seller, one of the main reasons I like to sell on Amazon instead of other marketplaces is because of FBA. This is what really makes Amazon a truly "location-independent" business that you can run from anywhere. With selling on any other platform, you need to pick, pack, and ship boxes yourself (or set up a warehouse to do it).Meghla Bhardwaj
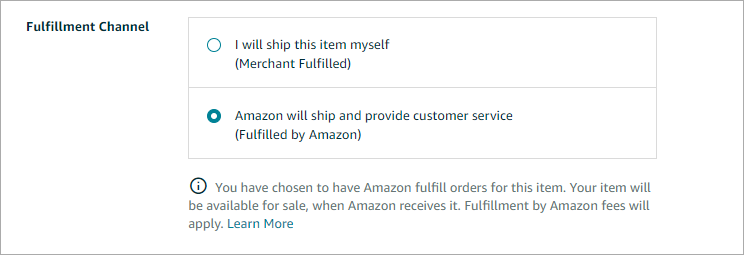
Selling on Amazon FBA is simple. To be eligible, you must be approved as an individual or professional seller. After setting up your account, you’ll list the items you want to sell. Assuming you are not manufacturing your own product, you’ll select your product from Amazon’s catalog and enter three main pieces of information:
If you want to use FBA to fulfill orders, select “Amazon will ship and provide customer service” as the fulfillment channel. You have the option to save this setting for additional products you add to your Amazon store. If you select this option and it’s your first time using FBA, you’ll be taken to a registration screen where you can read and accept the FBA terms of service.
You don’t have to use FBA for every item you sell on Amazon. If you know that a particular product is likely to be slow to move, it might make more sense to fulfill it yourself. It’s also worth noting that certain products such as hazmat items cannot be sold via FBA.
You’ll need to manually choose which items you want to fulfill with FBA. Go to the Inventory tab of your Seller Central homepage and select Manage All Inventory. You can edit the fulfillment method for each of your ASINs by selecting “Change to Fulfilled By Amazon” in the drop-down menu for each product. If you want to fulfill several ASINs with FBA, select the checkbox next to each of those items and then choose “Change to Fulfilled By Amazon” from the drop-down menu at the top of the page.
It’s important to know that after you convert your listings to FBA, they will be temporarily unavailable to shoppers until your inventory is received by Amazon.
If you are a seller looking to expand your business, Amazon FBA is one of the key platforms for you to engage with. The ability to reach the entire Amazon customer base AND have the Prime badge with free shipping afford any company that manages its business effectively to grow exponentially.Eric Kauss
Being an FBA partner does not come without challenges that need to be managed correctly so as to not drain profitability. Some of the areas which need an experienced staff to manage are inventory, storage fees, returns, and customer communication. One other challenge is knowing an effectively run business will probably begin to see sales above expectations. How these increased expectations are managed will be the key to being profitable. Know what you want to achieve by selling on Amazon and stick to the plan that works for you.
The best way to ship to Amazon FBA is to make sure you understand the shipping and preparation requirements for your products.
To prepare your shipment, you’ll need to create a shipping plan that includes:
It is your responsibility to learn how to ship to FBA and ensure that your products are shipped to Amazon safely. When you create your shipping plan in Seller Central, your shipment will likely be divided into multiple shipments to be sent to different fulfillment centers. This allows your inventory to be received and distributed to customers quickly. If you prefer to send a single shipment, you can pay a per-item service fee for the FBA Inventory Prep Service.
See Packaging Your Items for FBA for more information about prepping and labeling common product types. You can choose to prep items yourself or pay a per-item fee for Amazon to prep products for you. If your products are not prepped in accordance with Amazon FBA requirements, you may be charged for unplanned prep services.
 Workers at Amazon fulfillment centers don’t have time for surprises. Accurate box content information allows for quick processing and gets inventory sellable faster. Amazon charges a fee to manually process a box’s contents, should you fail to provide box content information. You can submit this information in Seller Central via a web form or upload, with a 2D barcode, via the Send to Amazon workflow, or with Amazon Marketplace Web Service. See the full list of box content information requirements for more information.
You are required to provide accurate carton weight and Amazon FBA dimensions for all shipments. Note that box weight policies are strictly enforced. Do not send overweight boxes to fulfillment centers. You may be blocked from creating FBA shipments in the future if you violate this policy.
SellerPulse by eComEngine includes a dimensions change alert! Get notified when your product dimensions change and request new measurements if they seem inaccurate. This can help you avoid unnecessary fees.
Follow Amazon’s shipping label requirements to ensure that items arrive at Amazon fulfillment centers quickly and safely. There are separate shipping guidelines for small parcel deliveries and less than truckload/full truckload shipments. Every box or pallet you ship to Amazon FBA needs a unique box ID. Check out the full list of requirements for more information.
The FBA box ID label and shipping carrier label must be scannable and readable. Make sure that your shipment is packed so that labels can be scanned quickly when the shipment arrives at the fulfillment center. This will help prevent inventory receiving delays. You should also be aware of key inventory dates throughout the year, especially around Prime Day and Q4.
The Amazon Shipment Performance dashboard can help you identify top problems with your shipments, including incorrect labeling and box content information, so you can avoid them in the future. You’ll be able to monitor your current problem rate against Amazon’s “acceptable” problem rate metric, review trends in your performance over the past 120 days, and resolve outstanding issues preventing your products from being available for sale sooner.
In order to sell on Amazon, you have to understand and adhere to Amazon’s policies. That holds true for any area of the platform, but there are specific policies associated with Amazon FBA. Seller Central can be an intimidating place, with policies on many different pages. Here is a comprehensive rundown of policies related to selling on Amazon FBA. Keep in mind that Amazon’s Seller Code of Conduct is a separate section of Seller Central. Make sure you’re familiar with all of Amazon’s program policies, even the ones not listed in this section.
If one of Amazon’s partner carriers loses or damages one of your items, or if it is damaged in an Amazon fulfillment center or damaged during delivery, Amazon may replace the item or reimburse the seller for the estimated proceeds from that item. Amazon considers several factors when determining eligibility for reimbursement, including your seller history, so make sure you’re familiar with all the points on the FBA Lost and Damaged Inventory Reimbursement policy page in Seller Central.
Barcodes are used to identify FBA products. Manufacturer barcodes are used by Amazon to track inventory throughout the fulfillment cycle unless you change your barcode setting. When multiple sellers have inventory with the same manufacturer barcode, FBA workers will pick the inventory that is closest in proximity to the customer. This is commingling.
Amazon barcodes should be applied to any products that are not intended for tracking with manufacturer barcodes. You can use Amazon barcodes on any item, but you’re required to use them for consumables, items with an expiration date, some beauty items, and products that have the manufacturer's barcode obscured.
Many sellers print and apply these barcodes during prep, but you can pay a per-item fee for Amazon to do it for you.
Brand owners can use Transparency authenticity stickers that help protect customers from counterfeit items. Check the Transparency page for more information, and make sure you read Amazon’s barcode requirements to make sure that your items are sorted at picked properly in Amazon fulfillment centers.
Amazon fulfillment centers only have so much space. Professional selling accounts will have inventory storage limits if their Inventory Performance Index (IPI) number drops below a certain threshold. IPI is calculated based on sell-through, stranded inventory, in-stock inventory, and excess inventory rates.

Amazon introduced FBA capacity limits in March 2023. You can see your FBA capacity limits in the Capacity Monitor in Seller Central. It's available on the FBA dashboard, Restock page, Inventory Performance Dashboard, Shipping Queue, and Send to Amazon. These limits include your on-hand inventory as well as any inbound FBA shipments. You have a separate capacity limit for each storage type (standard-size, oversize, apparel, footwear, or extra-large) each month. Amazon will provide your capacity limits for the upcoming month in the third full week of each current month in the Capacity Monitor and via email. You can bid for additional storage space if needed.


