There are two ways to create a PO in RestockPro. The most common way is to start an order from the Restock Suggestions page. Read instructions below, or, if you use another system to create POs, skip to Import a PO.
Start from the Restock Suggestions Page
1. First, go to Restock Suggestions and find the column that contains the Suggested Reorder Quantity.
Note: You may have to scroll all the way to the right within the Restock Suggestions grid. (Keep in mind that you can drag the column headers to reorder the columns.) Or, you may need to click the hamburger icon to add the column to the page if you hid it previously.![]()
2. Click the arrow to insert the Suggested Reorder Quantity into the Order Quantity box, or type a number of units directly into the Order Quantity column.
3. The "Create New Purchase Order" window will appear. If prompted, choose the source of the order as either "Supplier" or "Local Inventory" (This is only displayed if you have local inventory for a SKU.) Then, name your order and choose the destination (also known as the order type):
- Directly to Amazon (direct ship order): your supplier will ship these items straight to FBA.
- If you choose "Local Inventory" as the source, this will be the only option shown; RestockPro will then guide you through creating a shipment to Amazon.
- If you choose "Supplier" as the source, RestockPro will guide you to create a shipment, then you can download the PO after the shipment is created.
- My Warehouse (local order): you will receive these items and store them in your local inventory to ship to FBA in the future.
Learn more about each order type here.
4. If you chose the My Warehouse option, choose the shipping address where the supplier should send the items from the Address drop-down in the lower right. (Set up your warehouse or receiving addresses by going to Options > Locations.)
5. Click "Create PO."
6. Now, you will see the Restock Suggestions grid again, filtered by items that come from the same supplier (or from your local inventory, if you chose that source at the beginning). You can add more items to the same PO by checking the boxes next to them on the left, or check the box at the top left of the grid to add all items at once. As you add products, the tiles at the top of the page will update to show the number of SKUs, total weight, number of units, and total value of the order.
7. When you have finished adding any items you want to include, click the action button toward the top right of the screen to proceed, depending on the order source and type.
- If you chose My Warehouse as the source or chose "Directly to FBA" as the order type, click "Create FBA Shipment" to start the process of shipping the items from your local inventory to Amazon. (Learn about Amazon shipments in RestockPro.)
- If you chose other options, click "Create PO" to continue creating a purchase order for your supplier, and continue following these instructions.
8. When you have clicked "Create PO," the Purchase Order Preview window will appear.
Note: You can change what columns will appear on your POs by going to Options > Settings > PO settings. Learn more.
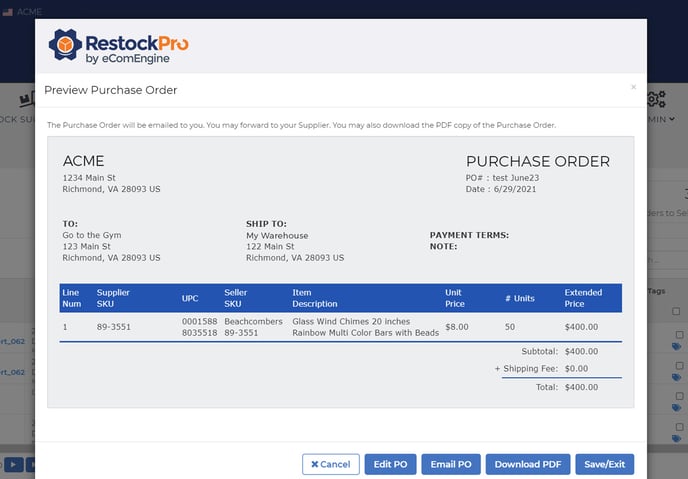
Here, you can edit the PO if needed, then choose how to get it to your supplier:
- Email PO: Send it to your RestockPro login email (as a PDF attachment).
- Download PDF: Save a PDF that you can send to your supplier.
- Save and Exit: Skip past the email or download step and simply mark these items as ordered.
Tip: If you choose Save and Exit, you can go back later to download or email the PO.
The "Email PO" option is available for POs that are still in a status of PO Sent, Receiving, or Received. Just click the envelope icon in the Options column. 
For all other statuses, click the name of the PO to go to the PO Details page, then click the hamburger icon and choose "Download All" or "Download Current View" to get a CSV file of the PO.

The basics of your PO are now complete, but you can visit the POs and Shipments page to make edits (e.g. if your supplier can't send the full quantity you ordered), add notes, and even delete a PO.
9. When the items arrive, go to the POs and Shipments page to receive them by clicking "Receive items" next to the PO in the Next Step column of the grid.
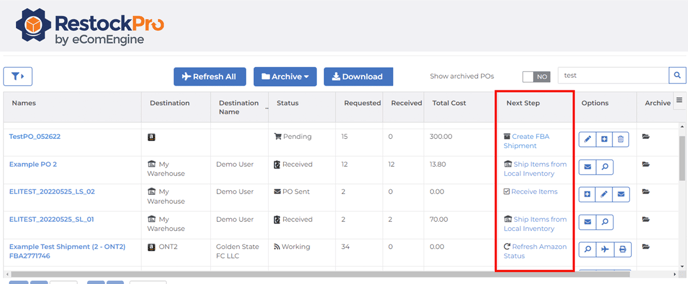
RestockPro will then prompt you to ship items from Local Inventory, making it easy to send the same items to FBA once they are prepped.
Import a PO
If you prefer not to start a PO from within RestockPro, or if you need to add outstanding POs when you first start using RestockPro, you can import an existing PO via CSV:
- Prepare a CSV file for your order by clicking the hamburger icon at the top right of the Restock Suggestions grid and selecting "Get New PO Template." Fill in the template file with the items you need to order and save as a CSV.
- On the Restock Suggestions page, click the "Purchase Order Actions" drop-down menu in the center above the grid. Select "Import a Supplier Purchase Order."
- Upload your CSV file.