Video
This video walkthrough shows how to start a shipment from the Restock Suggestions page. Scroll down for other options and step-by-step instructions.

Options for Starting a Shipment
You can start an Amazon shipment from several places in RestockPro, depending on your situation: the Restock Suggestions page, the POs and Shipments page, or the Local Inventory page.
From the Restock Suggestions page
If you have units of an item in local inventory, and RestockPro is suggesting that you send some to Amazon, you can start a shipment from the Restock Suggestions page.
1. Click the arrow by the suggested ship quantity to insert that number into the order quantity box and start an order.
Note: Although the modal will say "order" or "purchase order," you will actually be guided to create an Amazon shipment.
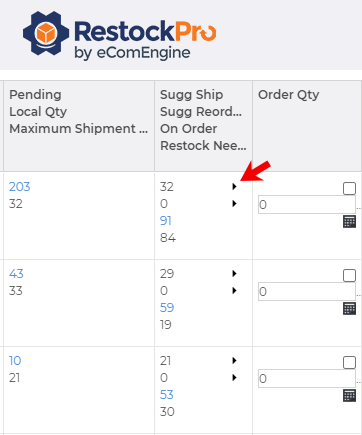
Tip: You may need to scroll to the far right of the Restock Suggestions grid and/or click the hamburger menu to add this column if it was removed.
![]()
2. Choose "My Warehouse" as the source if prompted.
3. Name the order, then click "Create PO."
4. You will now see the Restock Suggestions grid again, filtered by items with local quantities in your warehouse. Add quantities for any more items you want to ship to Amazon at this time.
5. Click the "Create FBA Shipment" button on the right side of the screen.
6. Proceed with the Shipment Wizard steps below.From the POs and Shipments page
If you have an existing local purchase order that has been fully received, you can start a shipment from the PO.
- Go to the POs and Shipments page and click into that order.
- Click "Next Step: Ship Items from Local Inventory."
- Proceed with the Shipment Wizard steps below.
From the Local Inventory page
If you have local inventory, you can go to the Local Inventory page and choose items to start a shipment:
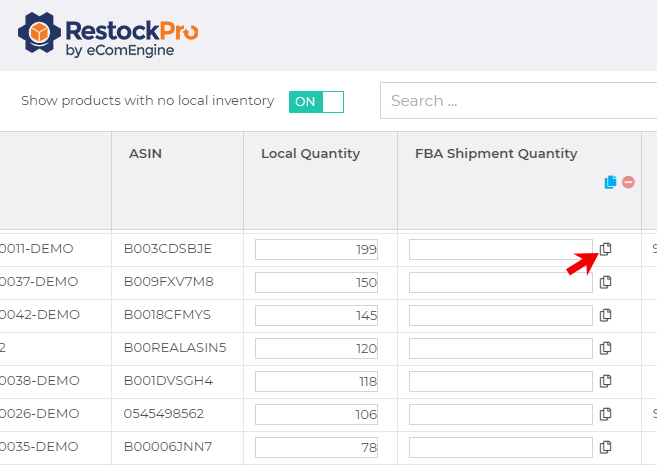
- Go to the Local Inventory page in RestockPro and use the column filters or search to find item(s) you need to ship to Amazon.
- In the FBA Shipment Quantity column, enter a number equal to or less than the number shown in the Local Quantity column (which is the number of units you currently have in your local inventory).
- Tip: Click the copy icon to copy the Local Quantity into the FBA Shipment Quantity column if you want to send all of your local units to Amazon now.
- Tip: Click the copy icon to copy the Local Quantity into the FBA Shipment Quantity column if you want to send all of your local units to Amazon now.
- Once you have added quantities for all the items you want to ship to FBA, click the "Create FBA Shipment" button on the left side of the screen.
- Proceed with the Shipment Wizard steps below.
Shipment Wizard
Any of the above options will start a Shipment Wizard that guides you through the rest of the process:
- First, you may be prompted to choose how you want to proceed:
- Take me to the RestockPro Create Shipment tool: Choose this to continue in RestockPro with the steps below.
- I will finalize the shipping plan on Seller Central: Choose this to log into Amazon and create a shipment.
- If you choose to create the shipment in RestockPro, next you will see a modal guiding you through the shipment process.
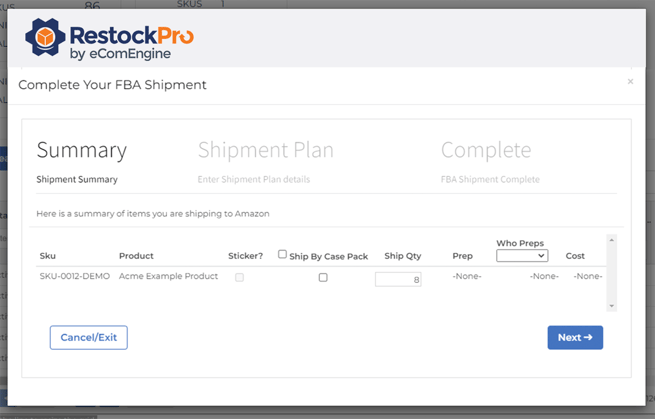
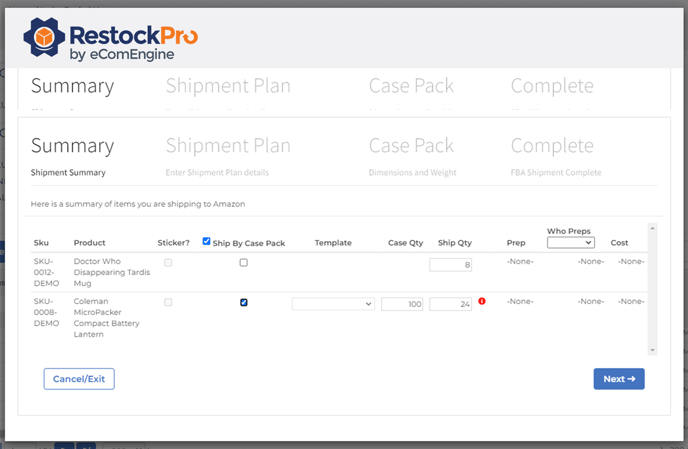
Ensure the details are correct on the pop-up modal and select options as needed:- Ship items by case pack: Check the box to ship by case pack, if applicable. A Case Qty column will appear automatically, along with the Ship Qty (which shows the number of units). Double check that the numbers are accurate and agree with each other.
- Template: If you checked the case pack box, a Template column with a drop-down will also appear. Use the drop-down to choose a box configuration template for each product. (You can add and edit these templates on the Products page.)
- Sticker? This box will be checked if Amazon requires labels for this item.
- Who preps: Choose whether the seller or Amazon will prep this item.
Note: This is a required field for Amazon's shipment workflow. If no prep is required for the item, choose "Seller."
- Click "Next" and check or edit the details on the next tab:
- Shipment Name: This will default to be the same as the order name you started with in RestockPro but can be changed.
- From Address: Select an address, e.g. your supplier's, your own, or your warehouse.
- Label Preference: Choose how you want to handle any required labels/stickers:
- Seller Label Only: the seller will label the items as required by Amazon.
- Amazon Label Only: Amazon will attempt to label any items that require labels. If they don't have enough information to label a product, that item will not be included in the shipping plan.
- Amazon Label Preferred: Amazon will attempt to label any items that require labels. If they don't have enough information to label a product, that item will still be included in the shipping plan, and the seller/supplier must label it.
- Click "Next."
- If you selected "Ship items by case pack," review the new Case Pack tab and insert box dimensions if needed. (If you chose a box configuration template on the first tab, dimensions will already be specified.)
- Click "Next" to download the shipping plan file.
- On the Complete tab, RestockPro will provide a link to the Send to Amazon workflow in Seller Central where you can upload the file.
Completed and Archived Shipments
Once a shipment is completed, it will be archived, but you can un-archive a shipment if needed:
- Go to the POs and Shipments page.
- Flip the switch to "Show Archived" if needed. Non-archived shipments have a closed folder icon beside them, while archived ones have an open folder icon:
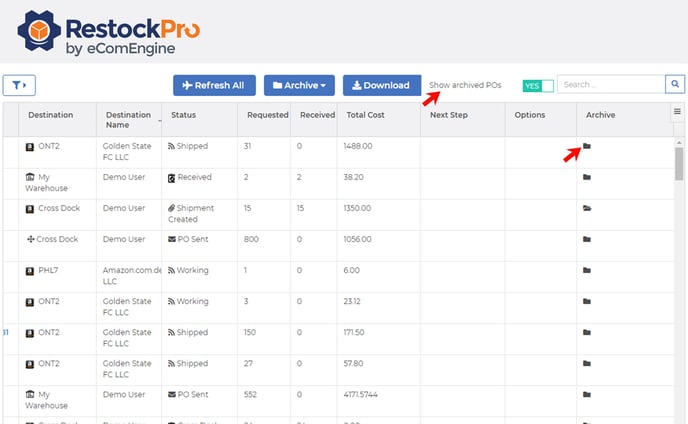
- Click the open folder icon in the "Archive" column to un-archive the shipment and confirm when prompted.
Note: Shipment steps may vary slightly depending on your order type or Restock Model.