See how in this video or scroll down for written instructions.
On the main Suppliers page, you’ll see a list of your suppliers and the following information:
- Lead times for each of the Restock Models
- Maximum target quantity on hand
- Minimum target quantity on hand
- Free freight minimum
- Target purchase order value
- Case pack rule
- Velocity estimation rule
- Notes
To add a new supplier, click "Add Supplier." To edit an existing supplier, click the name of the supplier.
When adding or editing a supplier, you’ll see a form to fill out the basic information for that supplier along with your restock rules and purchase order settings. You can fill out this information for suppliers individually, or you can upload a CSV of all your supplier information. (Click here to skip to CSV instructions.)
Supplier Information
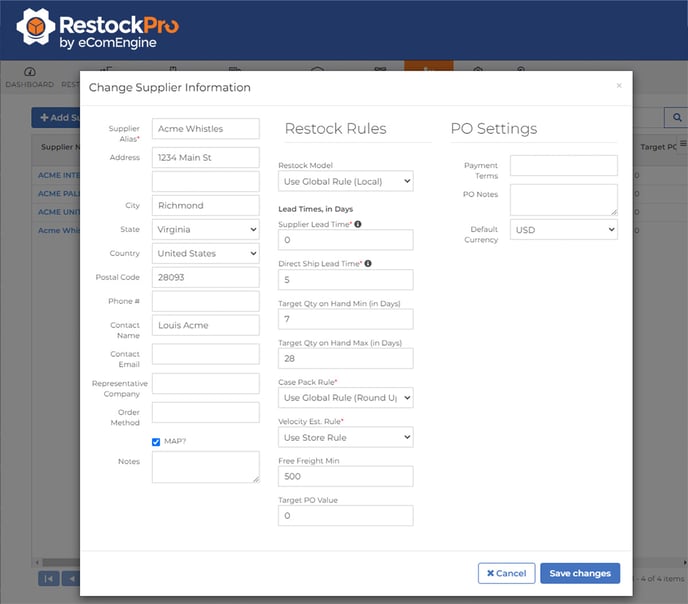
Supplier Name/Alias: The name of the supplier or an internal nickname that you use to refer to them. This name is used on the PO and throughout RestockPro.
Address, City, State, Zip: The supplier's address which is used on the PO or as the source address on shipments sent directly from the Supplier. (Note: If a new Supplier is added during the Product CSV upload, the address defaults to your store address but may be updated here.)
Phone number (optional): Any phone number you will need for reference when reordering from this supplier.
Contact Name, Contact Email, Representative Company, Notes: Free-form fields where you can add information about the Supplier for your reference.
Order Method: Free-form notes field where you can enter information about how to order from this supplier (e.g. "Download PO from RestockPro and email to [contact email]," or "Go to supplier's website to place order").
MAP?: Checkbox allowing you to select whether this supplier has a minimum advertised price for their products.
Restock Model: If you fulfill this supplier's product differently than the overall setting for your store, provide the restock model here. All suppliers will use the store setting for Restock Model unless you override it here, so it's best to set the store up for your most typical model and then set individual suppliers to different models if needed. Not sure what your typical Restock Model is? See Which order type or Restock Model should I choose?
Lead Times: The total time in calendar days required for this supplier's items to arrive at their destination after you order them. There are two fields under lead time:
- Supplier: The number of days from when you place the order to when it arrives at your local warehouse, prep center, or other location. This is particularly important if you'll use the local model.
- Direct Ship: The number of days from when you place the order to when it arrives at Amazon's Fulfillment Center and becomes available for fulfillment, if the supplier is shipping directly to Amazon for you.
Tip: If you will only use the Direct Ship Restock Model with this supplier, you can leave the Supplier lead time on the default, as it will not be used.
Lead times are a vital piece of the restock equation. Make sure they are as accurate as possible to get good restock suggestions.
Target Qty On Hand Min and Max in Days: These optional values override the same settings on the Restock Rules page for items coming from this supplier.
Case Pack Rule: This optional value overrides the same setting on the Restock Rules page for whether items that must be purchased in multiples are rounded up, down, or not at all, for items coming from this supplier.
Velocity Estimation Rule: This value specifies which time period uses to estimate demand, based on sales history. This defaults to the store setting unless you change it.
Payment Terms: Free-form text field that displays on the PO.
PO Notes: Free-form text field that displays on the PO.
Free Freight Minimum: Optional field where you can enter the order price at which you receive free shipping from this supplier.
Target PO Value: Optional field where you can enter how much you prefer to spend on each PO from this supplier, e.g. the amount you need to spend to get a discount or other benefit.
Note: On the Restock Suggestions page, where you will see a list of all your suppliers, a supplier will be flagged if the Restock Total Value is already higher than that supplier's Target PO Value or Free Freight Minimum. This lets you know that, if you order the Suggested Order Quantity, you will receive free shipping or another benefit, so you may want to prioritize this reorder.
Default Currency: The normal currency for the Supplier. If this currency is not the same as your home currency, you will be able to supply a currency conversion factor on the POs.
Adding Suppliers in Bulk
You can also upload a CSV of all your suppliers:
- Click CSV Options and choose "Get Template" to start from the beginning and add all your suppliers, or choose "Download All" to edit your existing suppliers and add more.
- If you are just getting started with RestockPro and you have an existing spreadsheet of supplier information to upload, download the template to get the correct column headers and use them in your existing spreadsheet. The column order does not matter, but column headers must match exactly.
- In the downloaded file, fill in or edit all the required information:
- Supplier's Alias
- Address Line 1, City, State, Country, Zip Code
- One of the Lead Time options, depending on the restock model you will use for this supplier (in calendar days; enter as a whole number)
- Case Pack Rule (to use the default store rule, type "Use Store Rule")
- Velocity Estimation Rule (to use the default store rule, type "Use Store Rule")
- Enter any of the optional information you want.
- Save the file as a CSV.
- Click CSV Options again and choose "Upload."
Note: You can also add suppliers by specifying a new supplier on the Product CSV upload. This will add a supplier's name without any other information. The remaining information can be added later via the Suppliers CSV upload or individually on the Suppliers page.
Check out our article on CSV Tips and Tricks for more information about using CSVs with RestockPro.