Adding Kit Parts
If your kit contains parts that you do not also sell as individual items through Amazon FBA, you will need to add those parts manually to RestockPro as products and give them SKUs in order to keep track of them. To add a kit part SKU:
- Go to the Products page in the top navigation.
- Click "Add Product" and fill in the name and SKU of the part.
- Use the Supplier drop-down to choose a supplier. (Note: RestockPro does not currently support multi-supplier kits. All kit parts must have the same supplier.)
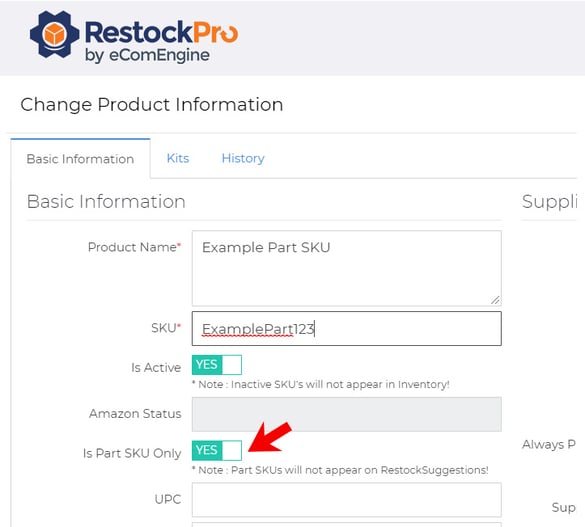
- Flip the switch for "Is part SKU only" to YES. This tells RestockPro that this item does not need to be restocked as its own listing; it will only be used in kits.
- Click "Save and Update All Pending POs."
If you do sell a kit part as a separate item on Amazon, it will show up as its own SKU on the Products page automatically, and you can skip to Defining a Kit.
Note: If you have a kit part SKU that is shared by multiple kits, and if that kit part needs to be purchased in cases, be sure to enter the Case Pack Quantity for the part SKU (not the kit).
Defining a Kit
Once you have the parts of your kit added or imported into the Products grid, you need to tell RestockPro which SKUs are kits and which parts make up each kit. To mark a SKU as a kit:
- Click on the SKU in the Products grid to see the Product Information popup.
- Make sure the correct supplier is selected for this kit SKU. (Note: This must be the same supplier that all kit parts come from.)
- Within the popup, click the Kits tab.
- Check the box for "This product is a kit."
- A blank Kit Parts list will appear. Click the plus sign icon on the left to see a list of all products from the same supplier, including the parts you have added manually.
- Look for the parts that make up this kit. To the right of each part, type the number of units of this part that go into a single unit of the kit.
- Click "Add to Kit," then click "Save and Update All Pending POs."

Now, RestockPro can automatically calculate the number of kits you can build using the Kit Optimizer. You can also build and break kits yourself on the Kits page. Learn more.
Modifying a Kit
To edit a kit, go to Products and click on the kit SKU. In the details modal, switch to the Kits tab and click "Modify Kit."
Tip: Use caution when changing a kit that has active quantities in your supply chain (i.e., on order, at Amazon, or in your Local inventory).
Deleting a Kit
To delete a kit:
- Go to Products.
- Search for the kit and click on its name to open the product details modal.
- Switch to the Kits tab.
- Remove all parts of the kit by clicking the red X to the right of each part.
- Click "Save and update all pending POs." This removes the association between the part SKUs and the kit SKU and turns the kit SKU into a regular SKU.
- If needed, you can then mark the former kit SKU and all its part SKUs as inactive.