For each order, you will see:
Order name: Click to open the details of the order and make edits (if applicable).
Source & Destination: Where the order or shipment is coming from (e.g. supplier, local warehouse) and going to (e.g. local warehouse, Amazon).
Status:
- Pending: The PO has been started in RestockPro but not yet sent to the supplier/completed.
- PO Sent: The PO has been sent to the supplier or completed; items have been ordered and RestockPro counts them as "On Order."
- Receiving (PO): The PO is being received at its destination (see the Destination column to see where it is being received, e.g. "My Warehouse"); you can still make edits to this PO.
- Received (PO): The PO is fully received at its destination; you can no longer make edits to this PO.
- Error: Something has gone wrong with this PO.
- Working: The shipment has been created, but you are still working on it; it has not yet been finalized and sent to Amazon.
- Ready to Ship: Labels have been printed for this shipment.
- Shipped: The shipment has been sent to Amazon.
- In_Transit: Amazon has received information from the carrier that the shipment is on its way.
- Delivered: The carrier says that the shipment has been delivered to Amazon, but Amazon has not yet checked it in.
- Receiving (Shipment): Amazon has begun scanning your shipment ID labels and making units available for sale.
- Closed/Partial: You have chosen to close this PO even though not all items have been received.
- Closed: Amazon has either confirmed all units received in your shipment, or your shipment has been open for more than 90 days since creation, whichever is first.
Requested & Received: The quantity ordered or shipped vs. the quantity received.
Total Cost: The total cost associated with the order.
Last updated: Last change made by a user.
Last sync: Last synced with Amazon.
Next Step: The next part of the process, based on the current status and order type.
Options: Actions relevant to the order type and status, including:
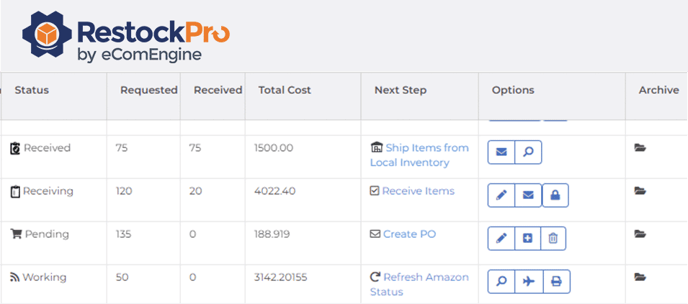
- Pencil: Open the PO to update the item amounts, notes, etc.
- Plus sign: Add more SKUs to the order. (Note: Clicking this on a PO with a status of "PO Sent" will revert the PO to "Pending" status.)
- Trash: Delete the PO (available only for orders with a pending status).
- Check box: Receive all items on this PO.
- Envelope: Email PO to yourself.
- Magnifying glass: View the order details.
- Airplane: View shipment plan on Amazon.
- Refresh: Refresh the Amazon status.
- Printer: View and print a pick list (see below). (Note: This option will not appear for a direct ship order, since the supplier will pick the items for you.)
Tags: Click the blue tag icon to add, change, or remove tags. Bulk select using the checkbox to apply the same tag to multiple orders. (If you cannot see the tag icon, try widening the column.)
Order Notes: Click the blue pencil to enter notes. This is useful for tracking ETA, documenting Amazon cases opened for a receiving discrepancy, or anything else.
Archive: Only Pending orders can be deleted; all others may be archived to hide them from view and ignore any outstanding quantities.
Print Pick List
Click the pick list option on a shipment to open a pop-up modal where you can view and print a summary of the items in that shipment, e.g. for your warehouse employees to pack the shipment for Amazon FBA.
On this modal, you can click the hamburger icon in the upper right corner of the grid to change the columns included in the pick list. You can also rearrange the columns by dragging the column headers or clicking a column header to sort by that column.
Note: You can also print a pick list for each specific box of a shipment. Click the shipment title to open it, then click Box Contents. Make sure box contents are specified, then click Print.
Adjust Columns and View
Click the hamburger menu in the upper right corner of the main POs and Shipments grid to set the column visibility. You can rearrange and sort columns here as well.
Filters
Click one of the tiles at the top of the page to filter open orders/shipments by destination (Inbound to Local Inventory, Inbound to Amazon) or to see only kit orders.
![]()
Click the funnel filter button to apply custom filters:
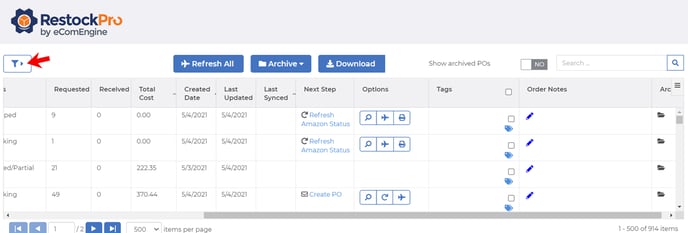
- Types: POs only, shipments only, or both
- Statuses: see above
- SKU: exact matches or strings within your SKU, the supplier SKU, the product name, and the ASIN
Refresh your Shipping Queue
RestockPro automatically synchronizes with your Amazon shipment queue about every hour, but you can click the Refresh All button to trigger the process manually if anything seems out of date.
Archive options
Click the Archive button to bulk archive shipments that are closed, deleted, canceled, or orders that are received. This helps you keep your POs and Shipments list clean and manageable.
You can also archive individual orders by clicking the folder icon in the Archive column of the grid. (Remember, if you don't see this column, click the hamburger icon at the top right of the grid to add columns that were removed.)
Use the “Show archived orders” slider to display archived orders or not. The closed folder icon indicates an archived order.
CSV options
Choose Download All to export a list of orders to a CSV, or Download Current View to export based on the currently applied filter.
Wondering how to create a new order? Start it on the Restock Suggestions page.