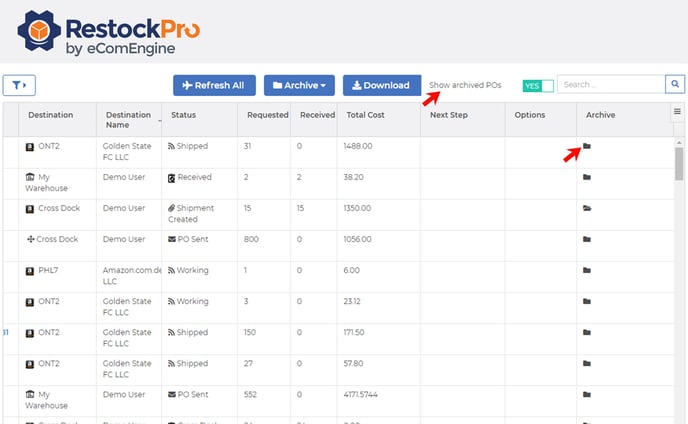
Note: If an order is archived, you cannot add items to it. Check for the "Archived" icon to see whether the PO has been archived. Toggle the "Show Archived POs" switch off if you prefer to filter these out.
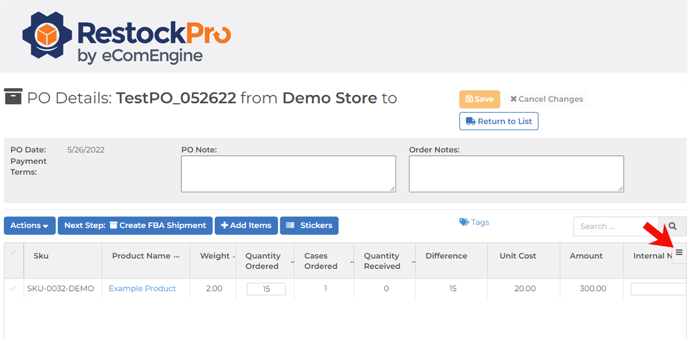
This shows you the PO Details page, where you can see the details of the PO and the products included in it, as well as actions you can take and information you can edit.
Note: The available actions and editable information will vary based on the order type and what stage it is in. Below is a summary of all options.
Actions
Select one or more items on the PO, then click the Actions menu to:
Mark received: Choose this to tell RestockPro that you received the expected units of this item from your supplier.
Remove from order: Choose this if your supplier could not send you the item, or if you added this item by mistake. This removes the on order quantity of this item from the Restock Suggestions page and calculations.
Apply line item discount: Choose this from the dropdown, then type a dollar/other currency amount or a percentage discount in the pop-up modal.
Note: You can add a discount to the order as a whole (instead of particular line items) by scrolling to the far bottom of the page, below the grid. Once you add line item discounts, this option will disappear, but you can bring it back by removing all line item discounts (see below).
Remove all line item discounts: Choose this to revert the selected item(s) back to the original pricing.
More Options
Use the buttons beside the Actions menu to:
Next Step: Depending on the type of order and what steps have already been completed, you may see a button prompting you to start the next step, such as "Receive Items" or "Create FBA Shipment."
Mark all received: Mark all the items on this PO as received at once, rather than selecting them individually.
+Add Items: Add more products to the PO. (Make sure you actually order these additional items from your supplier, if you didn't already!)
Mark as Closed/Partial: Finish this order, even though not all items have been received. Choosing this option means you can no longer edit the order, although you can still view it and print stickers.
Note: You may not need to mark an order as closed/partial if some of the items have not been received. You can adjust the item quantities in the grid, or remove items from the order completely using the Actions menu.
Stickers: Print labels for the items on this order. (Learn more about stickers here.)
Note: Some of the actions and options will disappear once the items are received or the order is closed.
Reopen a PO
If a PO was marked as Closed/Partial before, you can reopen it, as long as not all items have been received.
- Go to the PO tab.
- Click the "Reopen PO" button.
Notes and Other Information
PO Note: This note will be included on the PO, so this is where you can include requests or information for your supplier (e.g. about packaging or labels). You can add any note here on the PO Details page, and you can save a default PO Note for each of your suppliers on the Suppliers page (click the name of the supplier to add or edit information).
Order Notes: This is where you can make internal comments about the order that won't be seen by your suppliers, e.g. about ETA, order history, etc.
Internal Notes: These are note fields beside each item in the grid where you can make internal comments about specific SKUs, e.g. instructions to warehouse staff when items arrive or anything else.
Kit Build Notes: These are note fields beside each line item showing whether this item is a kit part and what quantity goes with what kit, to help you build kits before shipping them to Amazon. They are populated here automatically.
Tip: You can also see the kit SKUs themselves and their quantities on the PO Intent tab.
SKU Notes: These are note fields for each line item displaying any custom notes about this product. They are set on the Products page and populated here automatically.
Tags: Click the tags icon to add tags to the order. This is helpful for categorizing orders, specifying who worked on the order, etc.
CSV Options
Click the hamburger menu at the top right of the grid to see several download options:
Download all: Download a CSV of all the items and information on the order.
Download current view: Download only the information you are seeing in the grid. (You can add or remove columns in the same hamburger menu.)
Download prep guide: Download a CSV with all the basic information about the SKUs plus the prep notes and Amazon prep guide.