
A guide to getting started with your new inventory management tool.
Set up RestockPro in five easy steps:
- Connect to Amazon (if you didn’t during signup)
- Update your Restock Rules
- Add your Suppliers
- Assign Products to Suppliers
- Take a Test Drive
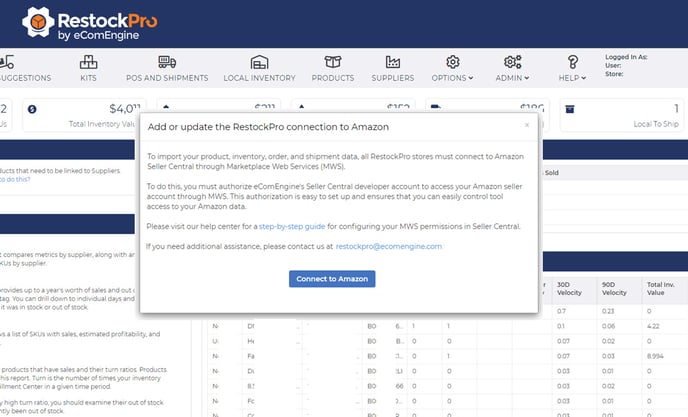
1. Connect to Amazon
If you didn’t connect during signup, you’ll need to connect the first time you log in. Click the button on the pop-up modal and follow the steps to log into Amazon and allow RestockPro to connect.
2. Update your Restock Rules
Go to Options > Settings in the top navigation to adjust your Restock Rules. These settings make sure that RestockPro will calculate your Restock Suggestions according to your business’s needs and help you create POs and shipments faster. Some of these settings, such as Restock Model, can be customized for specific suppliers later if needed.
A few of the most important settings are:
Restock Model: Select your default restock model (the one you use with most suppliers) to make adding new suppliers and products easier:
- Select Direct if the supplier will ship products directly to Amazon Fulfillment Centers.
- Select Local if the supplier will ship products to your warehouse or another location before you ship them to Amazon.
Local Lead Time: Input the number of days it typically takes for items to reach Amazon’s warehouse when you ship them yourself. If you’re not using the Local restock model at all, you can leave this as-is.
Target Quantities on Hand: This is primarily what RestockPro uses to flag your products when it’s time to replenish them. Based on your average sales per day, this is the number of days’ worth of inventory you want to keep at Amazon to stay in stock but avoid excess storage fees.
Sales Velocity: How far back do you want RestockPro to look when calculating demand? Usually, 30-90 days is a good place to start, but for newly launched products, a shorter time may be needed.
Ignore old shipments: How old should an unreceived shipment be before RestockPro will automatically ignore it? We recommend starting with 90 days here, but if you prefer not to automatically ignore any old shipments, you can leave this blank. (Instead, you can archive individual old shipments from the POs and Shipments page.)
All of these restock rules can be changed later if needed. Learn more about all the Restock Rules here.
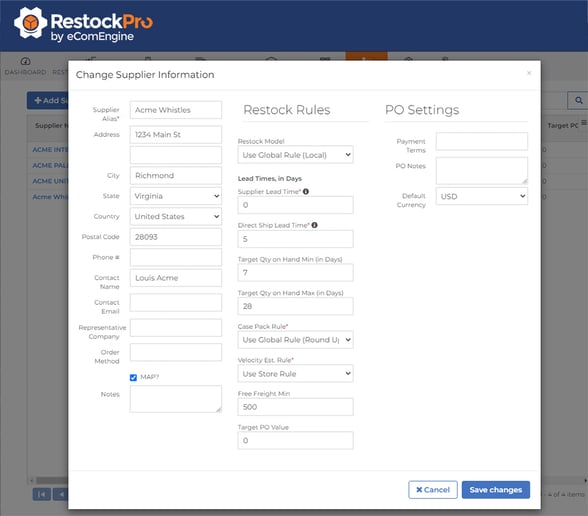
3. Add your Suppliers
Enter your supplier information so that you can create POs in RestockPro. You can add suppliers one by one, or in bulk by uploading a CSV.
To add a single supplier:
- Go to Suppliers in the top navigation
- Click on “Add Supplier”
- Fill in all required information: supplier alias (name), address, contact info, etc. All of this information can be edited later if needed.
- You only need to fill in one of the lead time fields, depending on the Restock Model you will use with this supplier. Ignore the other, as it will not be used.
- You can leave the Restock Model, target qty on hand fields, case pack rule, and velocity rule as-is to use the default settings you specified on the Restock Rules page. Or, you can change any of these for the specific supplier.
- Click “Save Changes” and repeat until you have added all your suppliers.
To add in bulk via CSV:
- Go to Suppliers in the top navigation
- Click on “CSV Options”
- Choose “Get Template”
- In the downloaded file, fill in the information. Only name and Velocity Estimation Rule are required for now, but we recommend filling in as many details as possible.
- For Restock Model and Velocity Estimation Rule, you can type “Use Store Rule” to use the default setting you selected on the Restock Rules page.
- Save as a CSV file
- Back on the Suppliers page in RestockPro, click on CSV Options > Upload
- Upload your edited file
Learn more about managing suppliers in RestockPro here.
4. Assign Products to Suppliers
RestockPro automatically imports your products from Amazon, but you need to specify which products you order from each supplier in order to create POs, filter and sort your Restock Suggestions, and view certain reports. You can connect products to suppliers one by one or via CSV upload.
To connect products individually:
- Go to Products in the top navigation
- Click on the name of a product
- In the pop-up modal, use the drop-down for “Supplier Alias” to select one of the suppliers you have added to RestockPro
- Add any other product information you choose, such as supplier cost (recommended to help you analyze profitability), SKU prep notes, tags to help you filter and categorize products, and more (optional)
- Click “Save and Update all Pending POs”
To connect products via CSV:
- Go to Products in the top navigation.
- Click on the hamburger icon toward the top right of the grid and make sure all columns are selected.
- Click on “CSV Options.”
- Choose “Download.”
- In the downloaded file, add the supplier for each product to the Supplier column.
- Make any other updates you choose, such as supplier cost (recommended to help you analyze profitability), SKU prep notes, tags to help you filter and categorize products, and more (optional).
- Upload your edited file.
Note: If you come back to update product information later via CSV, we recommend making a backup copy of all product data first, to avoid accidentally deleting data. Product CSV uploads cannot be undone.
Learn more about managing products in RestockPro here.
5. Take a Test Drive
Now that you have your products and suppliers added and your settings adjusted to fit your needs, it’s time to test out the process:
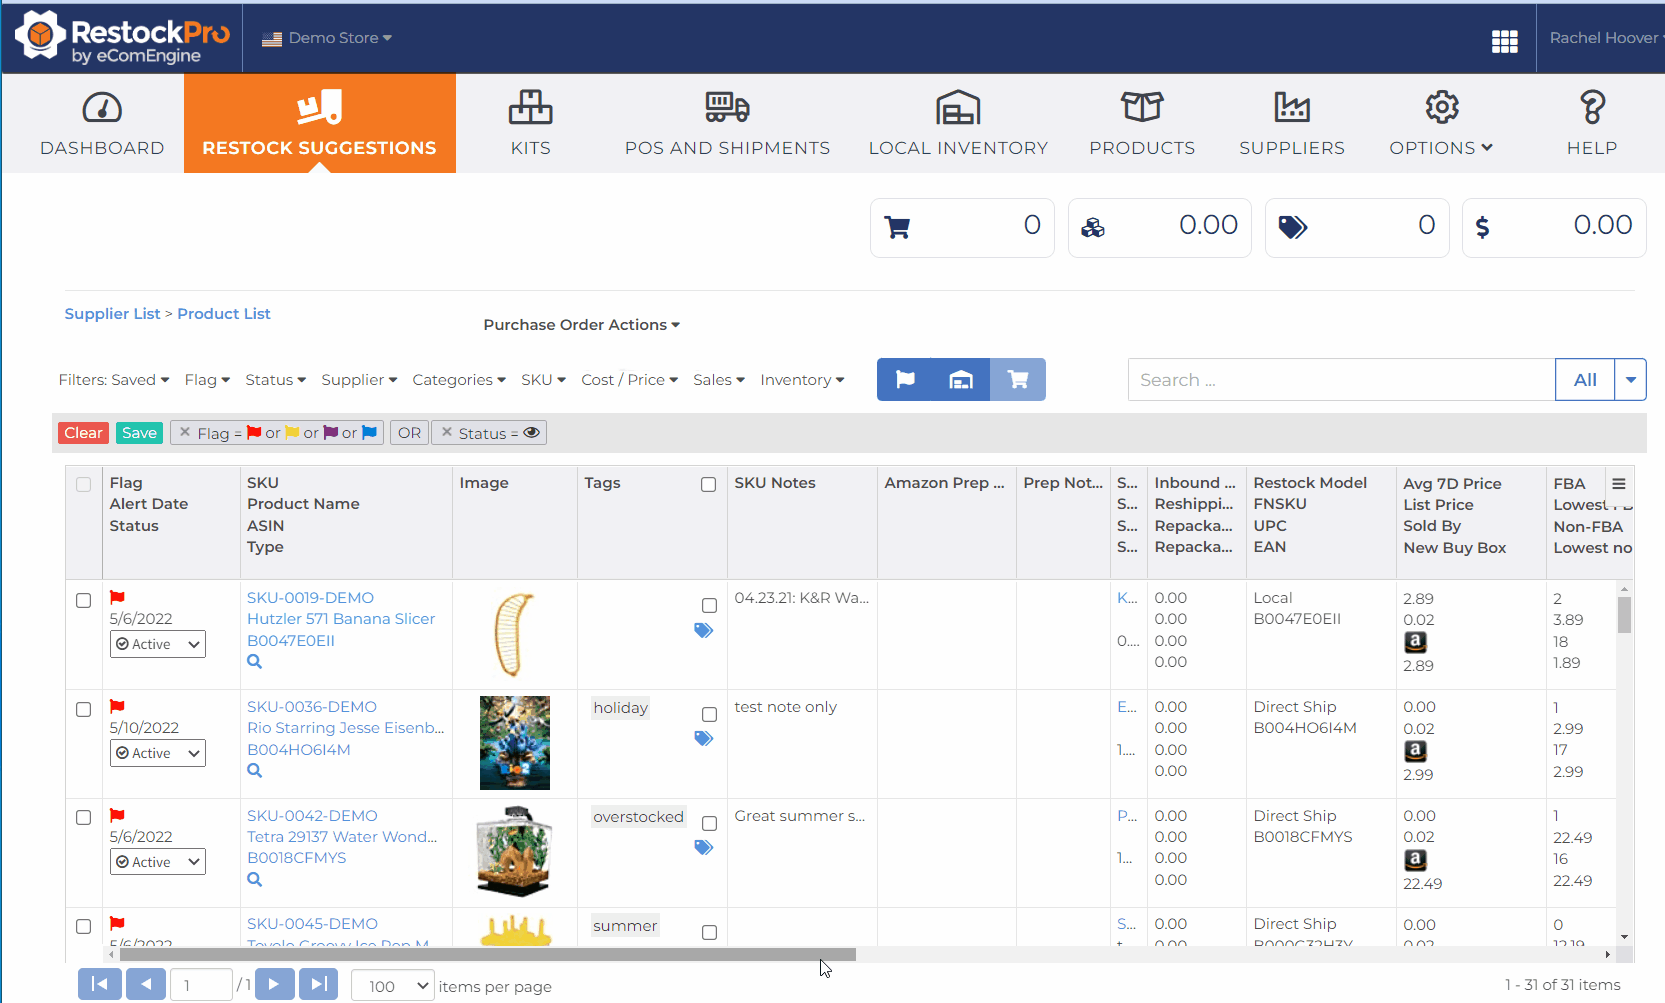
Check your Restock Suggestions screen:
-
Go to Restock Suggestions in the top navigation, then click “All Suppliers” in the grid.
-
Products will have color-coded flags to show you whether they need to be restocked now (red) or soon (yellow) or are out of stock (purple).
-
Use the Flags filter to see only what needs restocking.
Create a test PO by choosing a product that needs restocking:
-
Scroll to the right to see the suggested reorder quantity.
-
Click the arrow to accept the suggested reorder quantity, or manually enter a different number in the box (e.g. if you prefer to round up).
-
Follow the prompts in the pop-up modal to create your PO.
-
When the modal closes, you’ll see your list of products filtered by that supplier so that you can add additional items to your PO and order all products you need from that supplier at once, if you choose.
Next, create a shipment to Amazon:
Note: If you chose a direct ship model, you will actually be guided through creating your shipment first, then your PO.
- Go to POs and Shipments in the top navigation
- Look at the “Next Step” column in the grid. This guides you to continue the process based on the Restock Model of that PO/Shipment.
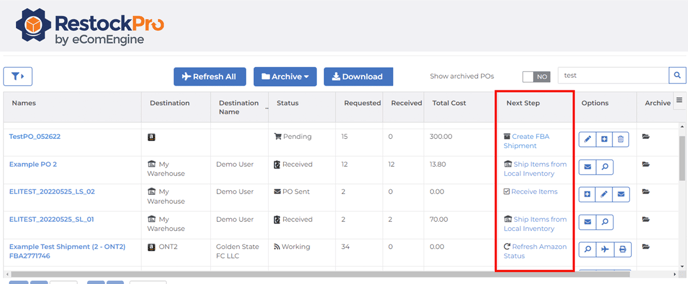
- When you have a prompt saying, “Create FBA Shipment,” click it and go through the steps provided to create your shipment to Amazon.
Note: If you create a test shipment and do not want to actually send this shipment to Amazon, stop at the step called “Review: Accept Shipment Plan” and click “Save/Exit”.
Ready to learn more?
- See Overview of Kits to learn how to handle bundles, multipacks, and other multi-unit products in RestockPro.
- See Manage your Local Inventory to learn how to work with the items in your own warehouse(s) with RestockPro.
- See the Analytics and Reporting section to learn about data RestockPro tracks to help you make your business more profitable.
- Schedule an onboarding session with a RestockPro expert to ask questions about your account and ensure you have set it up correctly.